 HVAC RefCharge Online Help
The HVAC RefCharge app is a refrigerant charging calculator that allows HVAC technicians to perform superheat and subcool refrigerant charge calculations on-the-fly. This app includes pressure/temperature data for over 100 common refrigerants.
This is a universal app that works on both the iPhone and iPad and automatically adjusts its screen size accordingly. This online help
will cover usage of both versions of the app.
This app now includes the HVAC Equipment Locator app built right in! The Locator app allows you to keep track of all of your HVAC equipment and then sync the information to the cloud so you can share with other authorized users. Click here to view the Equipment Locator help.
When you first start the app, the following screen will appear:
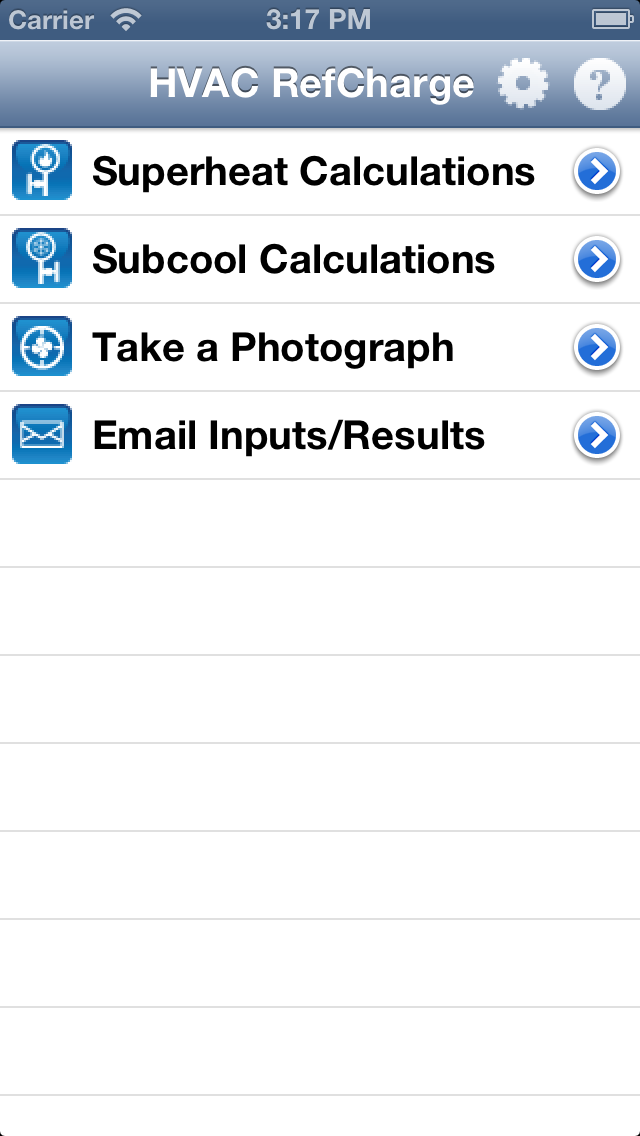
iPhone image

iPad Image
Before you begin entering temperatures and pressures, you need to select the refrigerant that you want to work with. On the iPhone or iPad version, click the "gear" icon in the upper right-hand corner to display the following form:
iPhone image
iPad Image
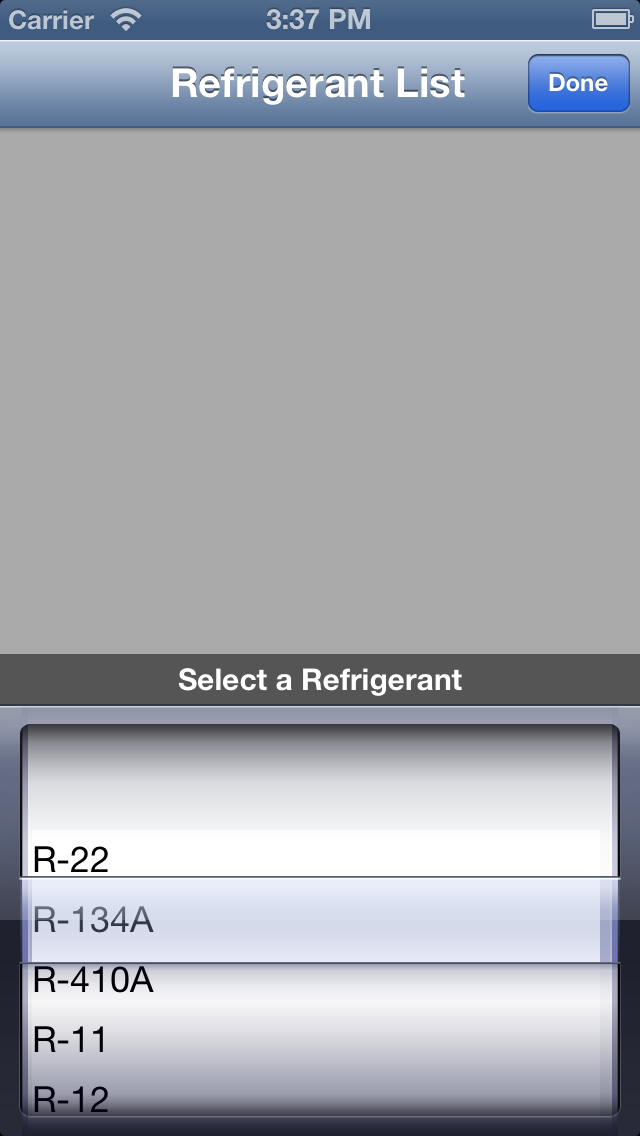
Select the blue button next to the "Refrigerant type" input to display the screen that allows you to select from 100+ different refrigerants. You will notice that they are in alphabetical order except for the first 5 (and most common) refrigerants.
We have recently added the "Dew" versions of any refrigerants that are azeotropic (mixtures). No matter which version of an azeotropic refrigerant you choose from in the refrigerant drop down, the app will use the correct version (dew or bubble) for either superheat or subcool calculations. For example, if you select "R-403A (Bubble)" and you want to do a superheat calculation, the app will automatically use the "R-403A (Dew)" refrigerant table to calculate the superheat results. If you select "R-403A (Dew)" and you want to do a subcool calculation, the app will automatically use the "R-403A (Bubble)" refrigerant table to calculate the subcool results.
After selecting the desired refrigerant, click "Done" to return to the previous screen. The top of the screen displays the calculated results. The bottom of the screen displays the inputs. Begin by entering the indoor wet-bulb and outdoor dry-bulb temperatures. You can either enter the exact values directly into the textboxes or use the slider control to increase or decrease the values. As you update these values, the results at the top of the screen immediately update.
iPhone image
iPad Image
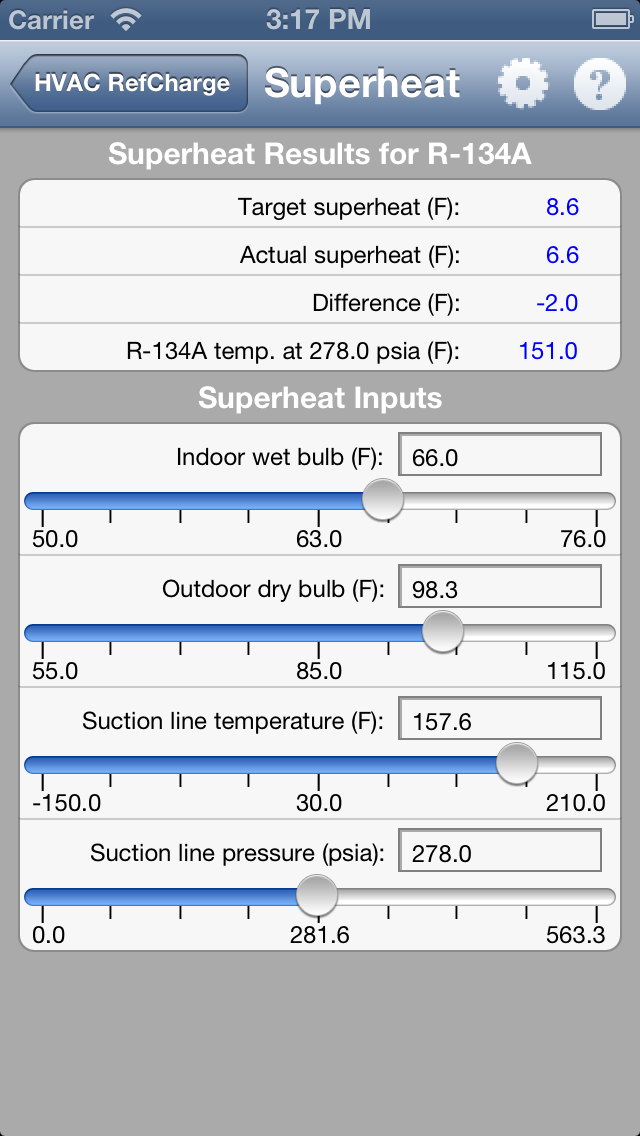
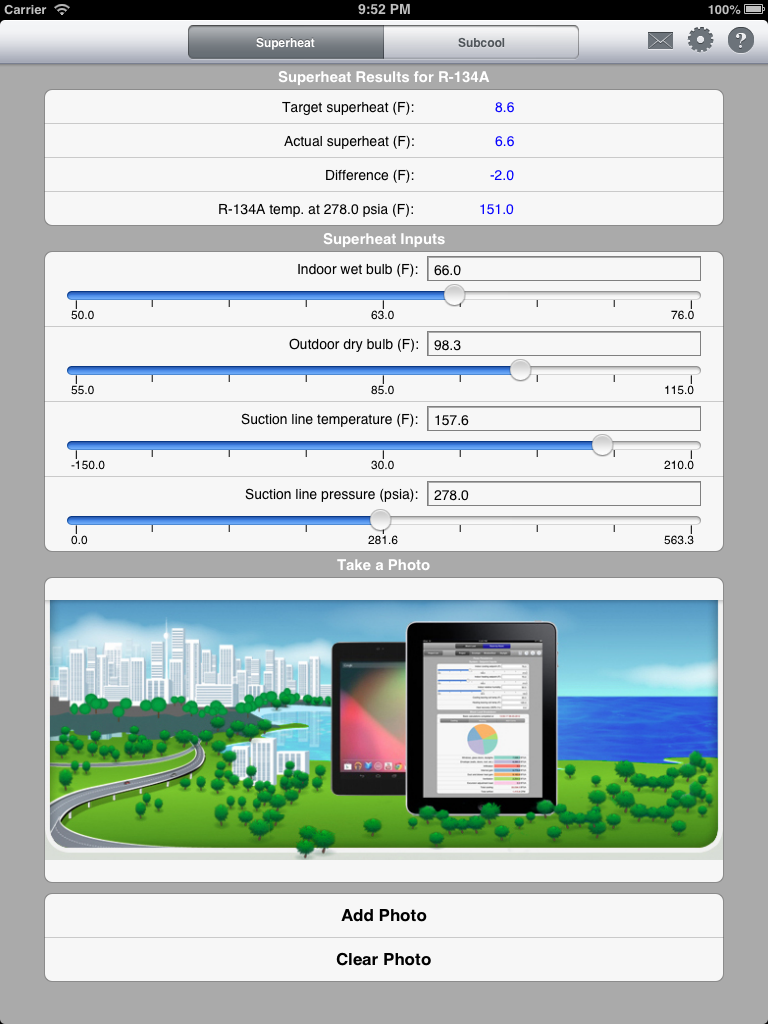
Next, enter the appropriate suction line temperature and pressure. The goal is to closely match the target and actual superheat temperatures, or at least get them within a desired range. The target superheat temperature is derived from the combination indoor wet-bulb/outdoor dry-bulb temperature inputs. The actual superheat temperature is derived from the combination suction line temperature and pressure inputs. The allowable difference is entered in the "Preferences" screen discussed below. If the calculated superheat temperature difference is greated than the allowable difference, then the number is displayed in red. If the difference is within the allowable range, then the number is displayed in blue.
As was already mentioned above, we have recently added the "Dew" versions of any refrigerants that are azeotropic (mixtures). Therefore, no matter which version of an azeotropic refrigerant you choose from in the refrigerant drop down, the app will use the correct version (dew or bubble) for either superheat or subcool calculations. For example, if you select "R-403A (Bubble)" and you want to do a superheat calculation, the app will automatically use the "R-403A (Dew)" refrigerant table to calculate the superheat results.
iPhone image
iPad Image
Before you begin entering temperatures and pressures, you need to select the refrigerant that you want to work with (see explanation above). Begin by entering the indoor wet-bulb and outdoor dry-bulb temperatures.
iPhone image
iPad Image
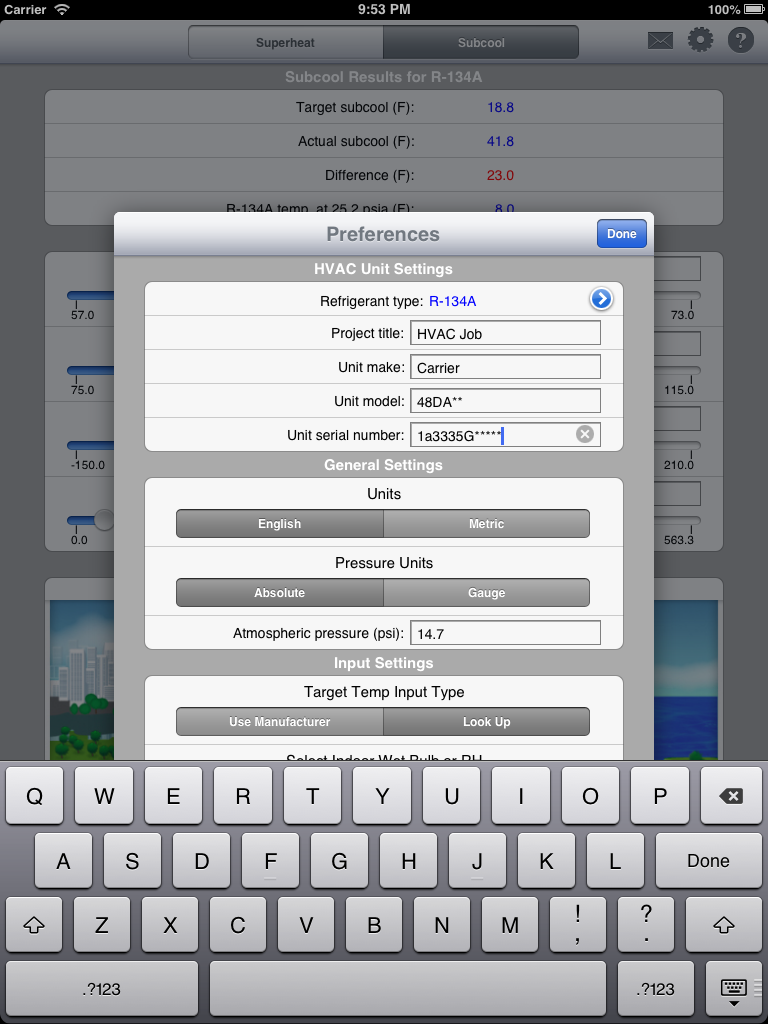
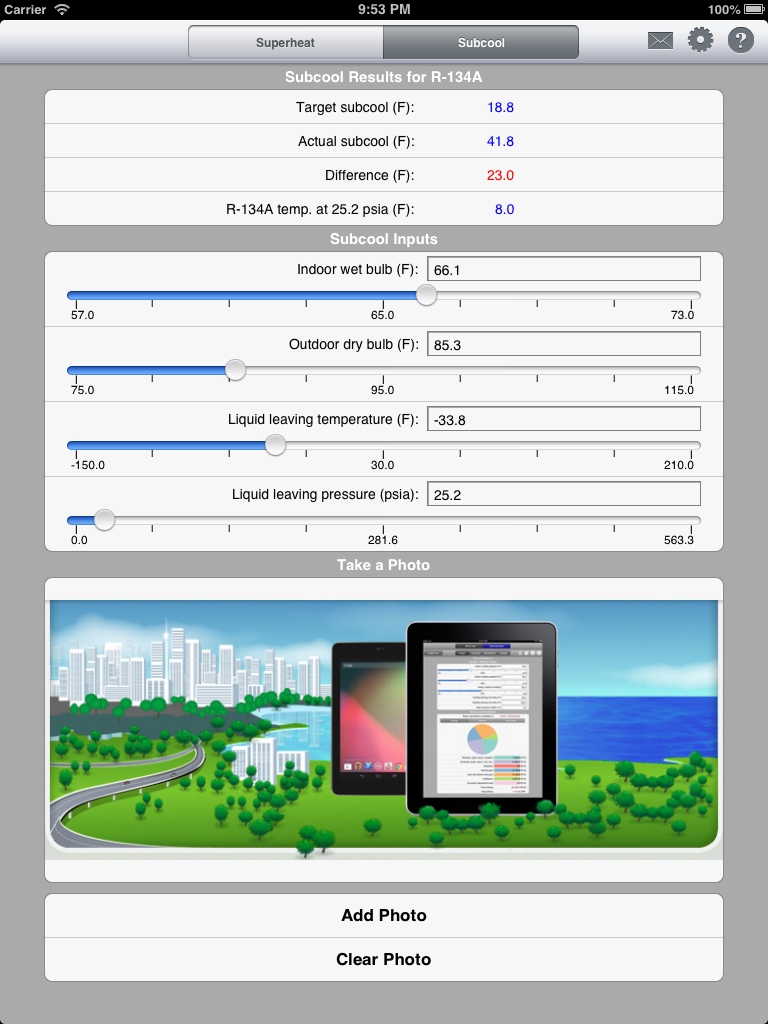
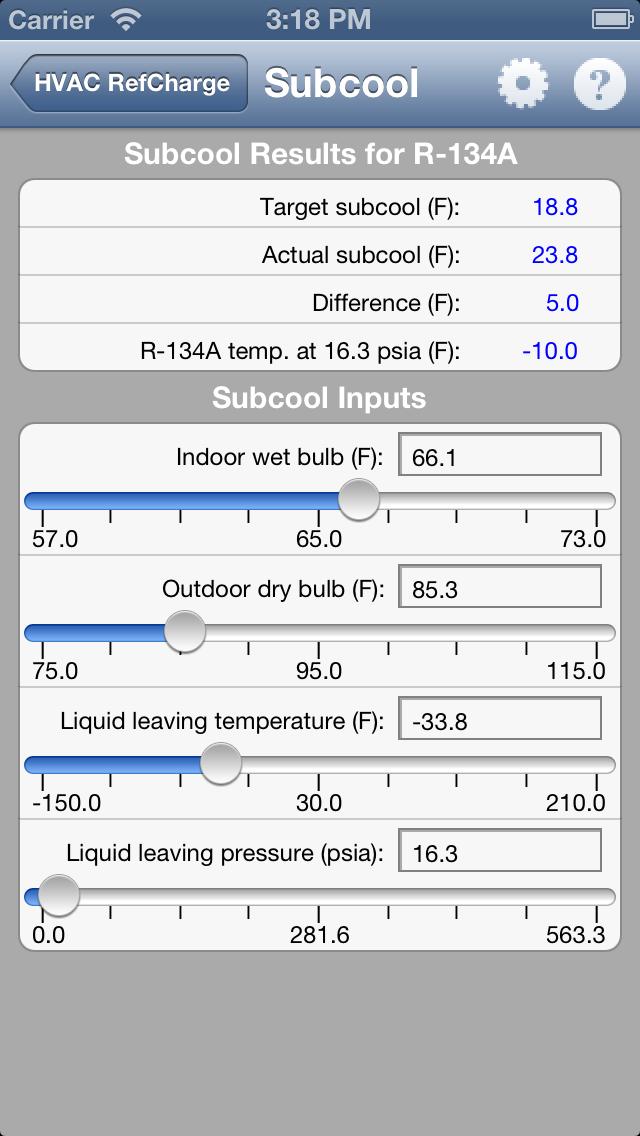
Next, enter the appropriate liquid leaving temperature and pressure. The goal is to closely match the target and actual subcool temperatures, or at least get them within a desired range. The target subcool temperature is derived from the combination indoor wet-bulb/outdoor dry-bulb temperature inputs. The actual subcool temperature is derived from the liquid leaving temperature and pressure inputs. The allowable difference is entered in the "Preferences" screen discussed below. If the calculated subcool temperature difference is greated than the allowable difference, then the number is displayed in red. If the difference is within the allowable range, then the number is displayed in blue.
As was already mentioned above, we have recently added the "Dew" versions of any refrigerants that are azeotropic (mixtures). Therefore, no matter which version of an azeotropic refrigerant you choose from in the refrigerant drop down, the app will use the correct version (dew or bubble) for either superheat or subcool calculations. For example, if you select "R-403A (Dew)" and you want to do a subcool calculation, the app will automatically use the "R-403A (Bubble)" refrigerant table to calculate the subcool results.
iPhone image
iPad Image
When you select "Add Photo", the standard "Take a Photo" or "Select Photo" option will appear allowing you to do either. After taking (or selecting) the photo, it will appear on the screen. If you wish to clear the photo, press "Clear Photo".
iPhone image
iPad Image
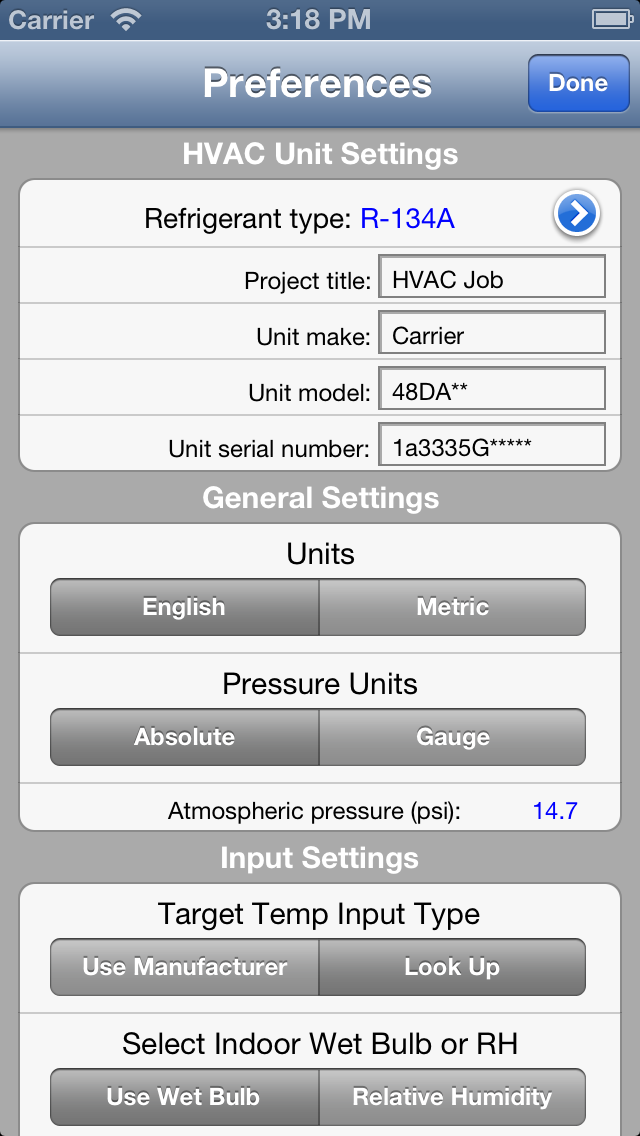
Refrigerant type: The "Refrigerant type" input was already discussed above.
Project title, Unit make, ....: These inputs are displayed in the email report (discussed below).
Units: Select the units (English or Metric) in which to display all inputs and results.
Pressure units: Select whether pressure units are displayed as absolute (psia) or gauge (psig). If you select "gauge", then all pressure values are subtracted by the following input value.
Atmospheric pressure: This value is only used if you selected "gauge" for the above option. This allows you to account for atmospheric pressure differences due to higher elevations like Denver, CO.
Target Temp Input Type: This option allows you to change the way the target temperature is calculated. By default, "Lookup" is selected. This means, that you are required to input the combination indoor wet-bulb/outdoor dry-bulb temperatures to derive the target superheat or subcool temperature. If you select "User Manufacturer", then these two inputs are not required and you simply enter the target temperature yourself.
Select Indoor Wet Bulb or RH: Select "Use Wet Bulb" if you want to enter the indoor wet bulb temperature directly in either superheat or subcool modes. If you are unsure of the indoor wet bulb temperature, then select "Relative Humidity", and you will be able to input the indoor dry bulb and indoor relative humidity values, and the indoor wet bulb temperature will be calculated for you.
Allowable difference: This value represents the allowable temperature difference between the target and actual superheat or subcool temperatures. If the actual difference is less than this allowable difference value, then the difference value displays in blue. If the actual difference is greater than the allowable difference, then the difference value displays in red.
Slider Behavior: Select "Absolute Value" to force the slider control to display minimum and maximum allowable temperature values that you are allowed to slide from. Select "Incremental" to force the slider control to act as an "incremental slider", meaning that as you move the slider to the left or the right, the temperature slightly increases or decreases.
The remaining inputs allow you to further refine the slider control behavior by setting maximum values, incremental ranges, and slider indicator step values.Email
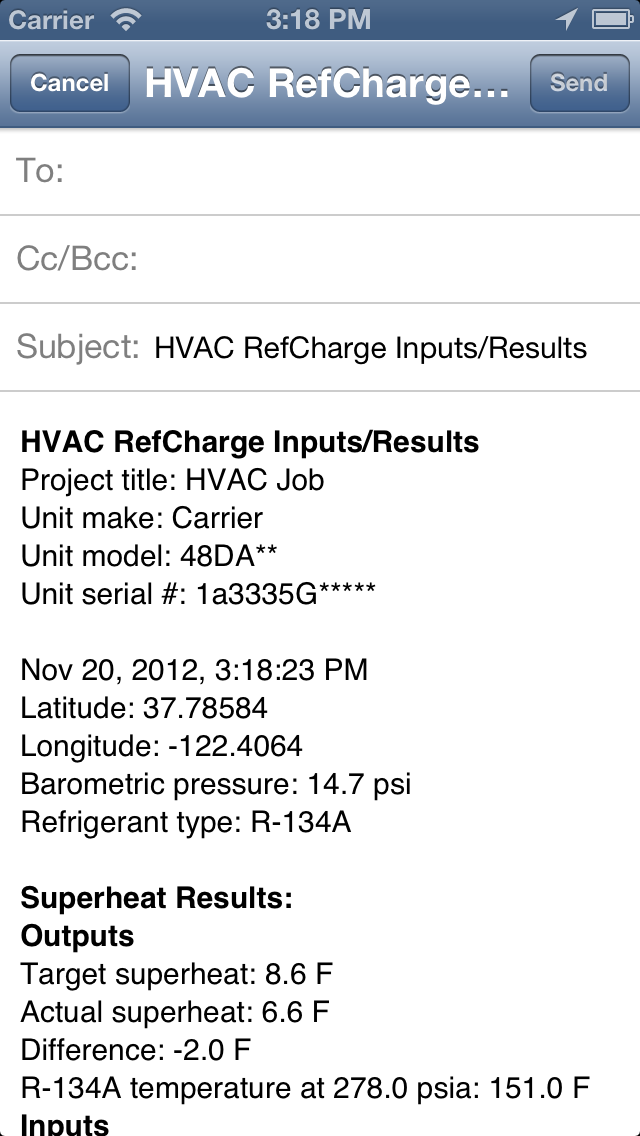
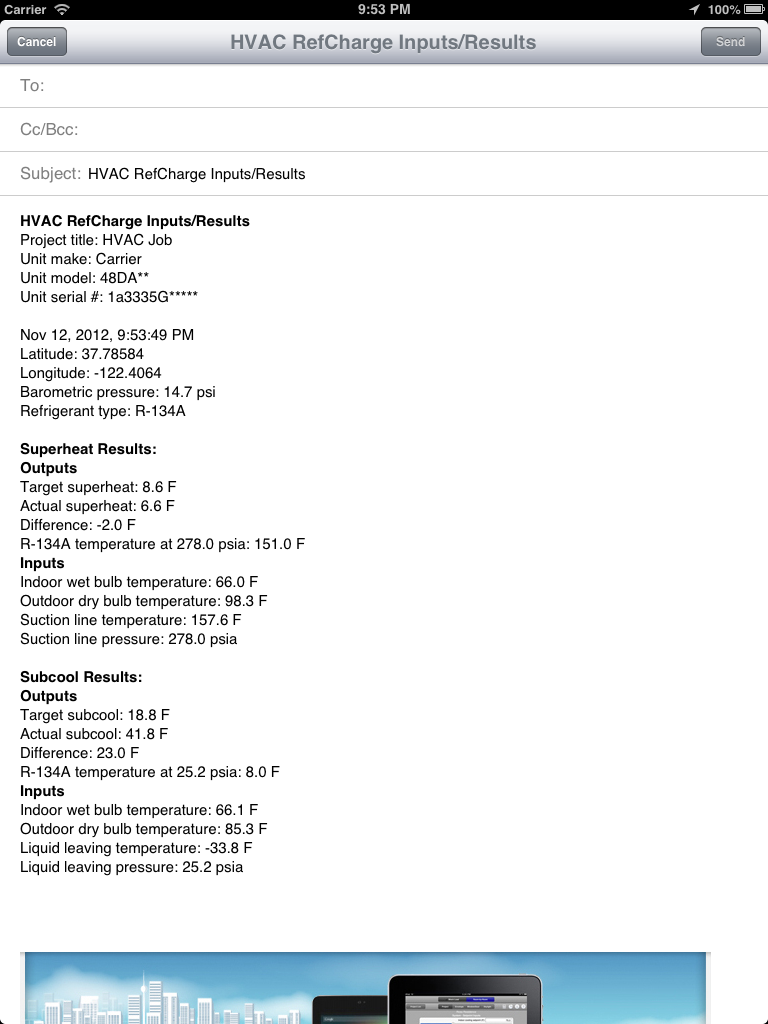
You can send an email that includes all of the inputs, results, and the photo. The email is formatted as an HTML email, and it also includes a .CSV attachment that can be opened in Microsoft Excel. On the iPhone version, select the "Send Email" menu option on the startup screen. On the iPad version, click the envelope icon located in the upper right-hand corner of the screen to display the following:
iPhone image
iPad Image
This app now includes the HVAC Equipment Locator app built right in! The Locator app allows you to keep track of all of your HVAC equipment and then sync the information to the cloud so you can share with other authorized users. Click here to view the Equipment Locator help.
When you first start the app, the following screen will appear:
iPhone image
iPad Image
Superheat Calcs
In the iPhone version, select "Superheat Calculations" to display the superheat screen. In the iPad version, the superheat screen displays on startup:
Before you begin entering temperatures and pressures, you need to select the refrigerant that you want to work with. On the iPhone or iPad version, click the "gear" icon in the upper right-hand corner to display the following form:
iPhone image
iPad Image
Select the blue button next to the "Refrigerant type" input to display the screen that allows you to select from 100+ different refrigerants. You will notice that they are in alphabetical order except for the first 5 (and most common) refrigerants.
We have recently added the "Dew" versions of any refrigerants that are azeotropic (mixtures). No matter which version of an azeotropic refrigerant you choose from in the refrigerant drop down, the app will use the correct version (dew or bubble) for either superheat or subcool calculations. For example, if you select "R-403A (Bubble)" and you want to do a superheat calculation, the app will automatically use the "R-403A (Dew)" refrigerant table to calculate the superheat results. If you select "R-403A (Dew)" and you want to do a subcool calculation, the app will automatically use the "R-403A (Bubble)" refrigerant table to calculate the subcool results.
After selecting the desired refrigerant, click "Done" to return to the previous screen. The top of the screen displays the calculated results. The bottom of the screen displays the inputs. Begin by entering the indoor wet-bulb and outdoor dry-bulb temperatures. You can either enter the exact values directly into the textboxes or use the slider control to increase or decrease the values. As you update these values, the results at the top of the screen immediately update.
iPhone image
iPad Image
Next, enter the appropriate suction line temperature and pressure. The goal is to closely match the target and actual superheat temperatures, or at least get them within a desired range. The target superheat temperature is derived from the combination indoor wet-bulb/outdoor dry-bulb temperature inputs. The actual superheat temperature is derived from the combination suction line temperature and pressure inputs. The allowable difference is entered in the "Preferences" screen discussed below. If the calculated superheat temperature difference is greated than the allowable difference, then the number is displayed in red. If the difference is within the allowable range, then the number is displayed in blue.
As was already mentioned above, we have recently added the "Dew" versions of any refrigerants that are azeotropic (mixtures). Therefore, no matter which version of an azeotropic refrigerant you choose from in the refrigerant drop down, the app will use the correct version (dew or bubble) for either superheat or subcool calculations. For example, if you select "R-403A (Bubble)" and you want to do a superheat calculation, the app will automatically use the "R-403A (Dew)" refrigerant table to calculate the superheat results.
Subcool Calcs
In the iPhone version, select "Subcool Calculations" to display the subcool screen. In the iPad version, select the Subcool option at the top of the screen:iPhone image
iPad Image
Before you begin entering temperatures and pressures, you need to select the refrigerant that you want to work with (see explanation above). Begin by entering the indoor wet-bulb and outdoor dry-bulb temperatures.
iPhone image
iPad Image
Next, enter the appropriate liquid leaving temperature and pressure. The goal is to closely match the target and actual subcool temperatures, or at least get them within a desired range. The target subcool temperature is derived from the combination indoor wet-bulb/outdoor dry-bulb temperature inputs. The actual subcool temperature is derived from the liquid leaving temperature and pressure inputs. The allowable difference is entered in the "Preferences" screen discussed below. If the calculated subcool temperature difference is greated than the allowable difference, then the number is displayed in red. If the difference is within the allowable range, then the number is displayed in blue.
As was already mentioned above, we have recently added the "Dew" versions of any refrigerants that are azeotropic (mixtures). Therefore, no matter which version of an azeotropic refrigerant you choose from in the refrigerant drop down, the app will use the correct version (dew or bubble) for either superheat or subcool calculations. For example, if you select "R-403A (Dew)" and you want to do a subcool calculation, the app will automatically use the "R-403A (Bubble)" refrigerant table to calculate the subcool results.
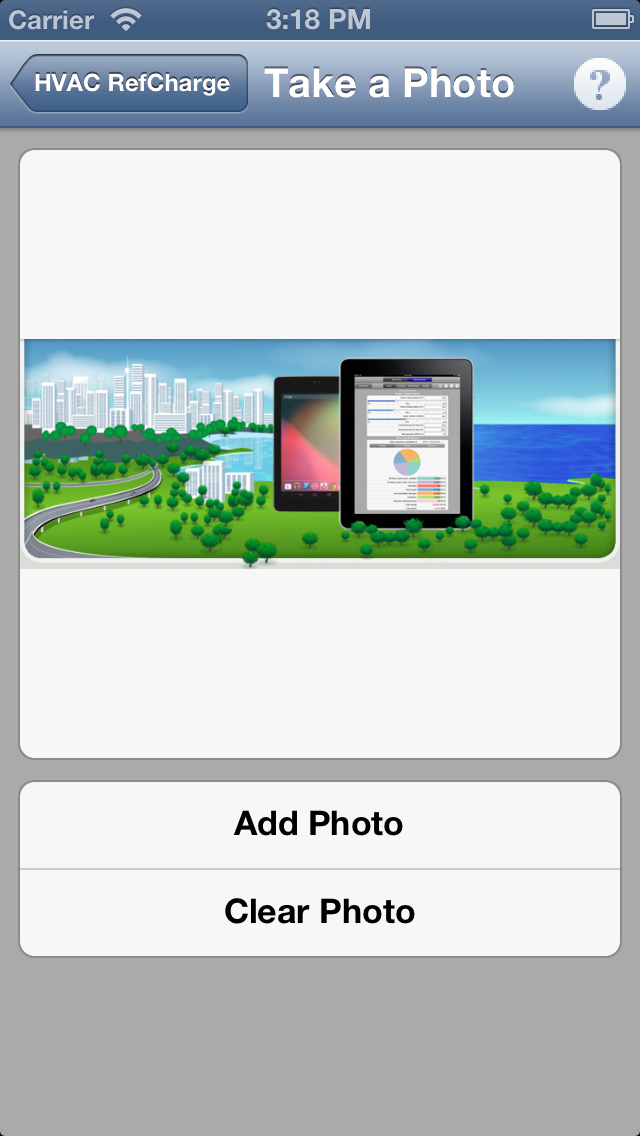
Take a Photograph
You can take (or select) a photo and assign it to the project. On the iPhone, select the "Take a Photo" menu option on the startup screen. On the iPad, select "Add Photo" at the bottom of either the superheat or subcool screen:iPhone image
iPad Image
When you select "Add Photo", the standard "Take a Photo" or "Select Photo" option will appear allowing you to do either. After taking (or selecting) the photo, it will appear on the screen. If you wish to clear the photo, press "Clear Photo".
Preferences
The Preferences screen is accessed by clicking the gear button in the upper right-hand corner of any screen in the app. The following form appears:iPhone image
iPad Image
Refrigerant type: The "Refrigerant type" input was already discussed above.
Project title, Unit make, ....: These inputs are displayed in the email report (discussed below).
Units: Select the units (English or Metric) in which to display all inputs and results.
Pressure units: Select whether pressure units are displayed as absolute (psia) or gauge (psig). If you select "gauge", then all pressure values are subtracted by the following input value.
Atmospheric pressure: This value is only used if you selected "gauge" for the above option. This allows you to account for atmospheric pressure differences due to higher elevations like Denver, CO.
Target Temp Input Type: This option allows you to change the way the target temperature is calculated. By default, "Lookup" is selected. This means, that you are required to input the combination indoor wet-bulb/outdoor dry-bulb temperatures to derive the target superheat or subcool temperature. If you select "User Manufacturer", then these two inputs are not required and you simply enter the target temperature yourself.
Select Indoor Wet Bulb or RH: Select "Use Wet Bulb" if you want to enter the indoor wet bulb temperature directly in either superheat or subcool modes. If you are unsure of the indoor wet bulb temperature, then select "Relative Humidity", and you will be able to input the indoor dry bulb and indoor relative humidity values, and the indoor wet bulb temperature will be calculated for you.
Allowable difference: This value represents the allowable temperature difference between the target and actual superheat or subcool temperatures. If the actual difference is less than this allowable difference value, then the difference value displays in blue. If the actual difference is greater than the allowable difference, then the difference value displays in red.
Slider Behavior: Select "Absolute Value" to force the slider control to display minimum and maximum allowable temperature values that you are allowed to slide from. Select "Incremental" to force the slider control to act as an "incremental slider", meaning that as you move the slider to the left or the right, the temperature slightly increases or decreases.
The remaining inputs allow you to further refine the slider control behavior by setting maximum values, incremental ranges, and slider indicator step values.
iPhone image
iPad Image